White Natural Versatile Plastic

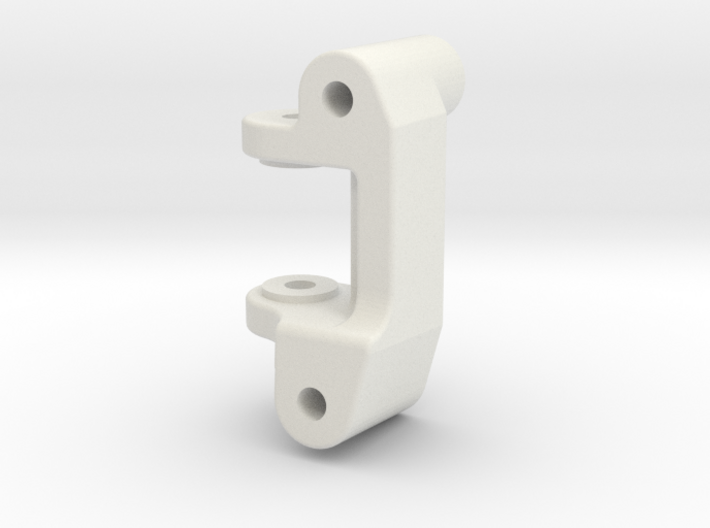
Tamiya Grasshopper 2 Ultra G 5 deg C hub Left
Made by
Print With Shapeways
 Choose Your Material
 Choose your color and finish
$6.23
Have a question about this product?
contact the designerYou must be logged in and verified to contact the designer.
Product Description
The Grasshopper 2 Ultra G project is a buggy I built which grafts a Thundershot rear gearbox and suspension onto the Grasshopper 2/Super Hornet/Rising Fighter Chassis.
For the Ultra G project I wanted to convert the front end to 4 bar suspension as well, using Thundershot blue wishbones to match the rear end. You mount these wishbones to the tub using the Ultra G double Wishbone suspension mount also available in my shop (https://shpws.me/QLkw)
The blue Thundershot wishbones are relatively short and designed for 4wd. It is possible to use regular DT02/3 c hubs for this, but they need a lot of spacers to make them fit. These C-hubs are a direct fit and have the added feature of 5 degrees of caster to improve the steering. You need this Left Hand C Hub, and you also need the Right Hand C Hub. Because they are angled DO NOT buy two of this item as a pair. They will not work. You need this part and the Right Hand part.
Preparation:
Pull the original steering arms, wishbones, uprights and wishbone cover off the buggy. You need to drill out the holes in all the 3D printed parts using a 3.1mm drill to give good movement.
Remove the servo, and replace the 2 small ball studs on the servo saver with 2 x 5mm ball end (see parts list below).
For the conversion you will need:
Suspension and steering:
1 x CTE RC Ultra G Wishbone Conversion Mount https://shpws.me/QLkw
2 x Tamiya 10005347 Thundershot/Dragon D parts (for the front wishbones)
2 x Plastic servo mounts - any will do
1 x CTE RC Ultra G 5 deg Left C Hubs (this item)
1 x CTE RC Ultra G 5 deg Right C Hub (https://shpws.me/QO4p)
2 x Tamiya 10555059 front uprights
2 x Long Tamiya Screwpins or 3mm x 48.5mm suspension shafts
6 x Short Tamiya Screwpins or 3mm x 22mm suspension shafts
Upper arms and steering rods:
Either DT02 turnbuckle set 53828 with just 2 out of the 50592 ball connector set plus 4 x 3x12 self tapping screws or:
Tamiya 50592 5mm Ball End (this is 10pc, but you only need 4)
Tamiya 19804206 5mm Ball Nut (4pc, you only need 2)
Tamiya 50875 5mm Ball Connector (8pc you will need them all)
M3 threaded rod
2 x M3 x 16 machine screws
4 x 3x12 self tapping screws
For the Grasshopper2 and Super Hornet you will also need Spring Mount Tamiya 9805082 and some front shock either Tamiya CVA mini shocks (64mm long) or similar length oil filled shocks and mounting hardware.
Replace the wishbone cover with the Ultra G Wishbone conversion mount https://shpws.me/QLkw.
Install the Wishbones with the 4 holes facing front. Use the long screwpins or 48.5mm shafts to mount to the conversion piece. These will be too long and can be trimmed if you'd like.
Install the CTE RC Ultra G 5 deg C-hubs and uprights using 4 of the short screwpins or the 22mm shafts.
Cut the servo saver mounts from the wishbone sprues. You need 2. Screw a 50592 ball end into the end of each of the servo savers. Butt the servo saver up again the chassis in front of the front shock arm rib in line with the top of the chassis. Use the hole in the servo saver as a guide to drill a 2.5mm hole through the tub. Screw the servo saver to the tub using one of the 3x12 self tappers. Drill a second 2.5mm hole through the servo and the tub in front of the first screw and screw in the second screw to secure. You now have you top arm mounting.
Slide the bottom of the shock into the outermost shock mounting hole on the wishbones and use the final two short screwpins to secure the bottom of the shocks.
Install the ball screws on the front of the c-hub tops using the machine screws. Now make up the top arms and new steering arms using either the turnbuckles or cutting the threaded rod and installing the ball connectors to the ends. I can't advise on exact lengths as it depends on which connectors you buy. Install the top arms between the tub mounts made from the servo saver and the c-hubs. Install your steering arms to the servo saver and re-install the servo and connect them to the uprights.
Setup the suspension so the front wheels are a degree or 2 of negative camber and a little bit of toe out.
Re-install the wheels and bodyshell and you have 4-bar front suspension.
Details
What's in the box:
Ultra G 5 deg C hub Left V3

Dimensions:
Success Rate:
First To try.
What's this?
Rating:
Mature audiences only.

