
White Natural Versatile Plastic

Hole guide 3 Gear Layback
Made by
Print With Shapeways
 Choose Your Material
 Choose your color and finish
$8.44
Have a question about this product?
contact the designerYou must be logged in and verified to contact the designer.
Product Description
This is the drill guide for converting a Tamiya TRF211XM or TRF201XM/XMW, or TRF201XR to a 3 gear layback transmission. Unlike the previously released 3 gear laydown transmission, this drivetrain uses the stock Tamiya 27t idler gear to pull the motor rearwards (9mm back from the laydown, 17mm forward from the Tamiya 4 gear motor position) and improves traction in medium/mixed grip conditions by weighting the rear wheels more. It still uses the Yokomo motor plate and the Fibre Lyte shock tower from the 3 gear laydown. The battery plate is unique to this transmission, and it also available from Fibre Lyte. Ask for the Layback Battery Plate.
For the complete conversion you will need this part, the Right Hand layback gearcase (http://shpws.me/QO4z), the left hand layback gearcase (xxxx) and either the transmission brace if you have the TRF211XM (http://shpws.me/QO4x), or the TRF201 Waterfall if you have a TRF201XR/M/MW (http://shpws.me/R4Wf). If you have previously purchased the 3 gear laydown conversion, you don't need a new Transmission brace or waterfall. These are the same as the laydown.
There is an optional Spur Gear Cover. If you don't want a cover you need the Spacer (http://shpws.me/R78x). There is a small cover which wrap over the top of the spur gear to protect your bodyshell (http://shpws.me/R6JE), or there is a full cover which encircles the spur gear as much as possible (http://shpws.me/R6Jr).
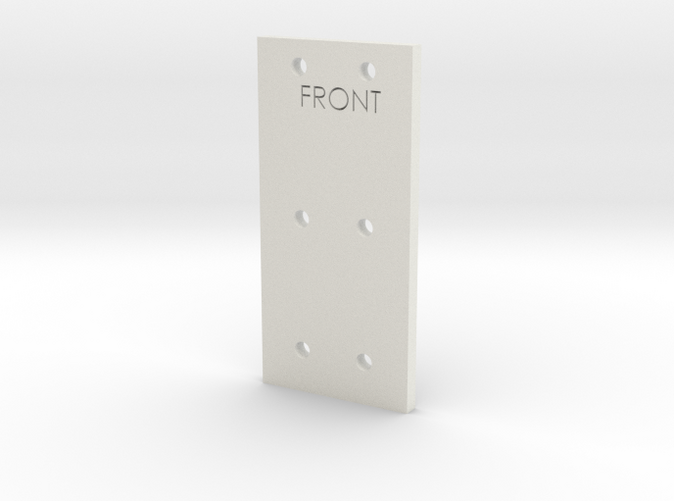
This hole guide should be bolted to the bottom of the tub with the centre set of holes on the guide plate, using the existing battery stop holes which are 47.5mm from the front transmission holes. The plate should be orientated with the wider spaced holes for the new battery stop position towards the front of the buggy. This is clearly marked FRONT on the part. The narrower set of holes towards the rear. After using the drill guide to drill the front and rear holes with a 3.1mm drill, on the TRF211 plastic tub open out the countersinks using an Xactoknife. Do not use a drill. For the aluminium XM/XR plate, drill the holes and open out the countersinks with a proper M3 countersink drill bit.
For details of the conversion see here:
https://www.tamiyaclub.com/forum/index.php?/topic/87185-trf211-3-gear-laydown/&do=findComment&comment=724337
For the complete conversion you will need this part, the Right Hand layback gearcase (http://shpws.me/QO4z), the left hand layback gearcase (xxxx) and either the transmission brace if you have the TRF211XM (http://shpws.me/QO4x), or the TRF201 Waterfall if you have a TRF201XR/M/MW (http://shpws.me/R4Wf). If you have previously purchased the 3 gear laydown conversion, you don't need a new Transmission brace or waterfall. These are the same as the laydown.
There is an optional Spur Gear Cover. If you don't want a cover you need the Spacer (http://shpws.me/R78x). There is a small cover which wrap over the top of the spur gear to protect your bodyshell (http://shpws.me/R6JE), or there is a full cover which encircles the spur gear as much as possible (http://shpws.me/R6Jr).
This hole guide should be bolted to the bottom of the tub with the centre set of holes on the guide plate, using the existing battery stop holes which are 47.5mm from the front transmission holes. The plate should be orientated with the wider spaced holes for the new battery stop position towards the front of the buggy. This is clearly marked FRONT on the part. The narrower set of holes towards the rear. After using the drill guide to drill the front and rear holes with a 3.1mm drill, on the TRF211 plastic tub open out the countersinks using an Xactoknife. Do not use a drill. For the aluminium XM/XR plate, drill the holes and open out the countersinks with a proper M3 countersink drill bit.
For details of the conversion see here:
https://www.tamiyaclub.com/forum/index.php?/topic/87185-trf211-3-gear-laydown/&do=findComment&comment=724337
Details
What's in the box:
Hole Guide 3 Gear Layback V2
Dimensions:
Success Rate:
First To try.
What's this?
Rating:
Mature audiences only.

