Clear Ultra Fine Detail Plastic

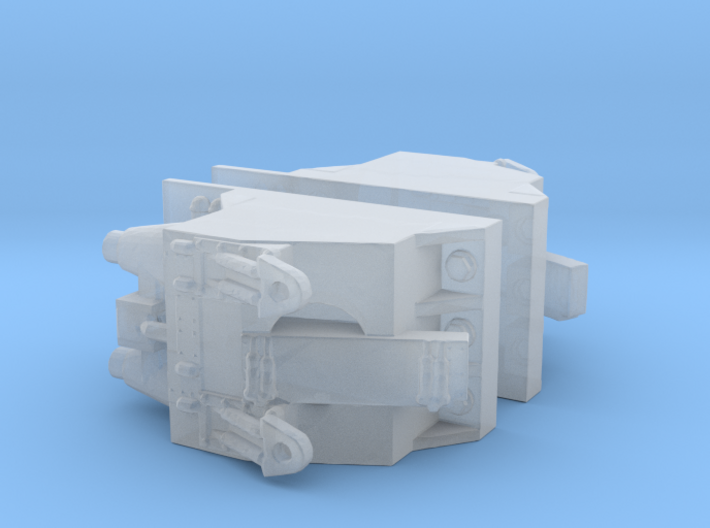
Excelsior Neck Inserts in 1/1000th Scale
Made by
Print With Shapeways
 Choose Your Material
 Choose your color and finish
$9.50
Have a question about this product?
contact the designerYou must be logged in and verified to contact the designer.
Product Description
A pair of accurate inserts for the neck area of the AMT-ERTL Excelsior and Enterprise-B models, as well as aftermarket resin necks. These are much more accurate than the kit parts, and closely match the parts used by ILM on the actual studio model, with allowances to make them printable, of course.
1. Before attempting anything, wash the parts gently in lukewarm soapy water with a very soft and fine brush, like an old toothbrush to remove any printing residues.
2. Whether you’re using the kit neck or the beautiful replacement resin neck available onlike at StarshipModeler.com, just carefully Dremel out the opening to the depth of the inserts.
3. Then, use files to square up the opening for nice snug fit, being careful not to damage the neck's exterior ribbing.
4. Install the parts to your desired depth. Superglue is likely your best adhesive.
5. On the actual studio model, the areas around the inserts weren’t lit. However, if you are planning on lighting your model please be advised that by opening up your neck for the inserts you may experience some light bleed. If illuminating the inserts is your intent, then super. Remember, they are hollow on the insides with a hole outboard, just like the studio model. It would be very interesting to see some non-canon lighting effects there! If you are planning on illuminating your model and do not want any light bleed, then remember to putty or otherwise seal up the interior areas of the inserts to neck join areas to avoid this.
5. Note: the parts were engineered from some pretty official blueprints and photos so I’m certain that they’re correct, or at least as certain as I can be. However, there’s no telling where AMT/ERTL got their info from, let alone its accuracy when they mastered the Excelsior and Enterprise-B models. So... While the parts are supposed to just slot into their openings without damaging the ribs immediately above and below, that may not be possible depending upon which neck you use. As a suggestion, consider not damaging the ribbing as it will detract from the looks of your model. Instead, LIGHTLY sand the tops and bottom of the inserts until they fit snugly. Just be sure not to remove any serious detail, and not to damage them. Wet sanding their tops and bottoms along a piece of very fine sandpaper should do the truck. Printed parts are brittle and fragile!
Details
What's in the box:
Exclsior Neck Parts for REsin Neck

Dimensions:
Success Rate:
First To try.
What's this?
Rating:
Mature audiences only.

More From This Shop
$5.00
